Do you want to switch to tubeless, but don’t know how? In this article, we will explain exactly what you need and what steps you need to take.
Contents
What is tubeless?
If you are not sure what tubeless is exactly or what the advantages are of riding with tubeless tires; read our article here about the difference between the different types of tires!
What do I need to make my tires tubeless?
If the advantages have convinced you, like they have us, to switch to tubeless tires, you will need the following items:
- Tubeless ready wheels
- Tubeless valve (Usually supplied with your wheels)
- (Tubeless rim tape)
- Tubeless ready tires
- Tubeless sealant (Barkeeper)(Optional) pump with a chamber or an air compressor
Small explanation about the items above:
- Not all wheels are suited for a tubeless set-up. Most modern wheels are, or are ‘tubeless ready’ which often means that you need to install a tubeless valve and tubeless rim tape. Always check the instructions of the manufacturer to be sure.
- Tubeless valves are typically supplied with wheels in the higher segments. If they were not with your wheels, you can purchase them separately. Always check the length of the valves and if they are suited for your wheels.
- Normal clincher tires are not suited for tubeless use. You need special TLE (Tubeless Easy) or TLR (Tubeless Ready) editions. A lot of manufacturers have tubeless versions of their tires these days, so possibly your favorite brand and model is already available.
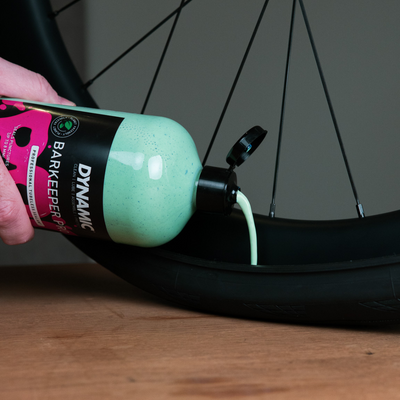
- Tubeless sealant is a liquid designed to seal small punctures in the tire. It also aids in sealing the tire against the rim during installation. Because of the sealant, also known as latex, any puncture will be sealed automatically during your ride. The maximum diameter of the puncture that a sealant will seal, differs between products. Barkeeper is able to seal punctures up to 7 mm in diameter.
How do I make my tires tubeless?
Step 1: Mounting the tubeless rim tape
Sometimes you need to apply tubeless rim tape yourself, of this has already been installed proceed to step 2. If not, follow these instructions:
Remove the old rim tape from the rim. Clean the rim well. Tape the new rim tape in the middle of the rim and make at least 2 full rotations. Often it is easiest to start just before the valve hole and finish just behind it. Now poke a small hole in the new rim tape where the valve hole is. Use something round, so the rimtape doesn’t tear.

Step 2: Mounting the tubeless valve
Put the tubeless valve through the valve hole in the rim and tighten the nut. Do this until it is pretty tight, but be careful not to overtighten it and damage your wheels. The result should be an airtight seal around the valve.

Step 3: Mount the tires
Put the tire on the rim. Use mounting fluid if needed. Always start across from the valve, as this allows the tire to be fitted with the least amount of effort.

Step 4: Inflating the tire
When the tire is in place on the rim, it is time to inflate the tire so that the beads pop into place. The easiest way to do this is with an air compressor, but often it can also be done with a regular track pump. Sometimes the tire seats itself in one time, but it can also happen that you need to try it 2 or 3 tries. You know the tire is seated when you hear 2 pops, these are the tire beads seating themselves.

Step 5: Adding sealant
Once the tire is properly seated, you can add the sealant. Deflate the tire and remove the valve core from the tubeless valves. Inject the following amount of sealant:
| Roadbike | 30 – 45 ml |
| MTB 26” | 60 – 75 ml |
| Cross/ Gravel | 60 – 75 ml |
| MTB 29” | 100 – 140 ml |
| Downhill MTB | 120 – 140 ml |
Install the valve core and inflate to the desired pressure.

Step 6: Spread the sealant
Rotate the wheel to spread the sealant around the tire. Hold the wheel horizontally and shake it to coat the sides of the tire with the sealant. You can also use our favorite method for spreading the sealant; go on a nice ride!

Exclusive Mechanics tip!
If you can’t get the tire to seat itself, try the following tip:
Remove your tubeless valve. Insert an inner tube in your tubeless tire and mount it on your wheel like you would a normal clincher tire. Inflate until the tire seats itself on the rim. Now deflate the tire again and carefully remove the inner tube through one side of the tire. The idea is to keep the other bead seated in the rim, so be careful to not unseat it. Reinstall your tubeless valve and remount the outer tire like in step 3. Now inflate until the tire is seated.
Products featured in this blog
Related blog posts
La bonne pression des pneus est essentielle pour la vitesse, le confort et le contrôle. Trop basse, elle augmente la résistance au roulement, trop haute, elle réduit la stabilité. Avec des outils précis comme la Turblo et la Turblo+, tu règles à chaque fois la pression parfaite, à la maison comme sur la route, pour garantir des performances maximales et une confiance totale à chaque sortie.
Pendant un mois entier, Road.cc a testé Barkeeper Pro et le produit d’étanchéité de Silca. Barkeeper Pro a obtenu un score 40 % plus élevé et a été décrit comme un produit d’étanchéité extrêmement efficace !


